In the previous tutorial on Placement and Routing using INNOVUS, we have seen how to open the tool and how to import all the files. In this tutorial, we will discuss how to prepare view definition file by performing Multi Mode Multi Corner (MMMC) analysis. MMMC analysis is very important to perform, so that the IC can work on different mode of PVT (Process, Voltage, and Temperature). The variations in PVT can insert extra delay in the circuits and due to this delay timing constraints may not be met. Thus the IC must be robustly checked for every process corners. This post is on MMMC file setup for PnR using INNOVUS.
Required Files
- Timing Libraries – Liberty Files (LIB) contains the timing related informations regarding the standard cells and the IO pads. Three type of timing libraries can be there which are fast-fast, slow-slow and typical. All these files are must be mentioned when preparing MMMC file.
- Timing Constraints – Timing Constraints are written in SDC file. This file is very important while preparing MMMC file.
- Capacitance Table – Different sets of capacitance values are needed for creating various RC_Corners. This file is optional and can be generated by the tool itself. Here, default values are taken.
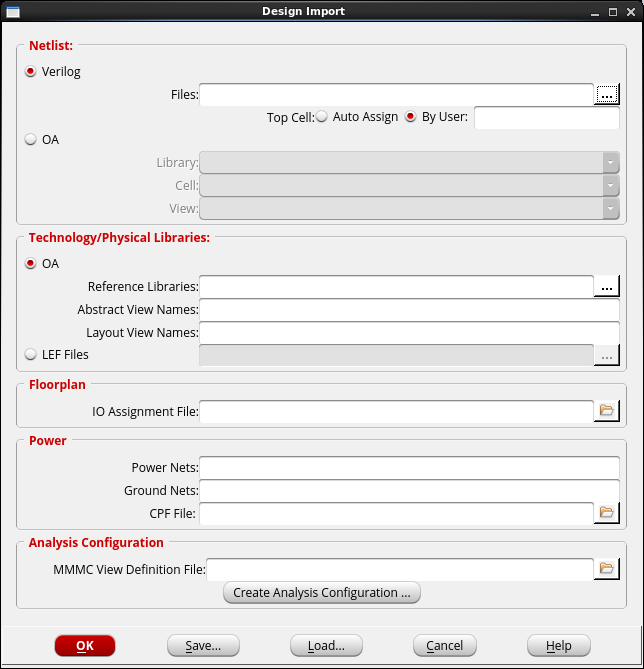
In the “analysis configuration” section of the design import window, the MMMC file can be imported or MMMC file can be created using MMMC browser. MMMC browser will open by clicking “Create Analysis Configuration” as shown in the following image.
MMMC browser is a tool to debug the timing setup and also creates view definition file. MMMC browser is shown in the following image.
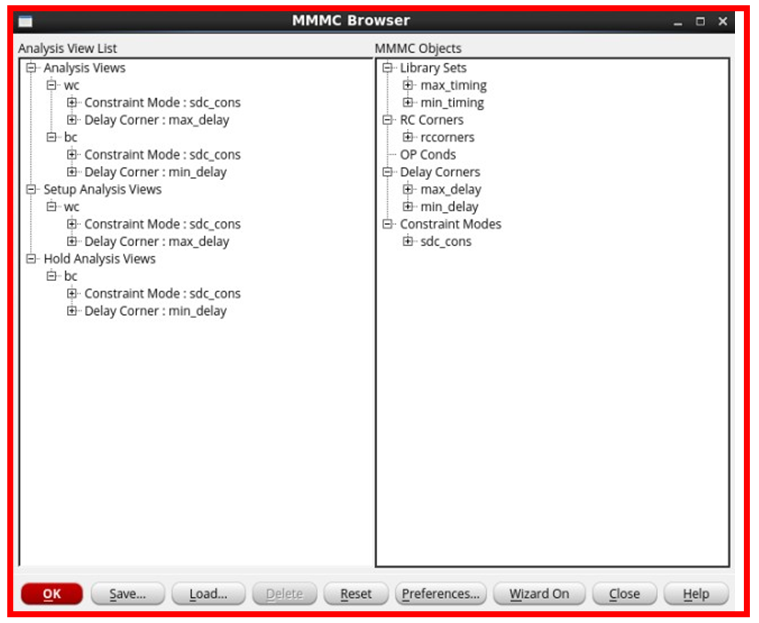
In creation of view definition file, all the steps are performed sequentially. For example, first step is to insert the details of the timing libraries. Based on the timing libraries and SDC constraints, different RC_corners, Delay_corners and Timing_corners are created. Based on these corners, two analysis views are created, one for Best Case and another for Worst Case. These analysis views are then used for setup and hold analysis. Once the different process corners are set in the MMMC browser then the configurations can be saved in a counter.view file that will be used in the design import phase. This file shown below.
# Version:1.0 MMMC View Definition File
# Do Not Remove Above Line
create_rc_corner -name RC_BEST -preRoute_res {1.0} -preRoute_cap {1.0} -preRoute_clkres {0.0} -preRoute_clkcap {0.0} -postRoute_res {1.0} -postRoute_cap {1.0} -postRoute_xcap {1.0} -postRoute_clkres {0.0} -postRoute_clkcap {0.0}
create_rc_corner -name RC_WORST -preRoute_res {1.0} -preRoute_cap {1.0} -preRoute_clkres {0.0} -preRoute_clkcap {0.0} -postRoute_res {1.0} -postRoute_cap {1.0} -postRoute_xcap {1.0} -postRoute_clkres {0.0} -postRoute_clkcap {0.0}
create_library_set -name MIN_TIMING -timing {libraries/tsl18fs120_scl_ff.lib libraries/tsl18cio250_4lm_typ.lib}
create_library_set -name MAX_TIMING -timing {libraries/tsl18fs120_scl_ss.lib libraries/tsl18cio250_4lm_typ.lib}
#create_library_set -name lib_180nm -timing {libraries/tsl18cio250_4lm_typ.lib}
create_constraint_mode -name CONSTRAINTS -sdc_files {libraries/cunter.sdc}
create_delay_corner -name MIN_DELAY -library_set {MIN_TIMING} -rc_corner {RC_WORST}
create_delay_corner -name MAX_DELAY -library_set {MAX_TIMING} -rc_corner {RC_BEST}
create_analysis_view -name BEST_CASE -constraint_mode {CONSTRAINTS} -delay_corner {MIN_DELAY}
create_analysis_view -name WORST_CASE -constraint_mode {CONSTRAINTS} -delay_corner {MAX_DELAY}
set_analysis_view -setup {WORST_CASE} -hold {BEST_CASE}
The counter.sdc file is shown below.
set sdc_version 1.7

set_units -capacitance 1000.0fF
set_units -time 1000.0ps

create_clock -name "CLKIN" -add -period 10.0 -waveform {0.0 5.0} [get_ports clk]
set_clock_transition -min 0.2 [get_clocks CLKIN]
set_clock_transition -max 0.25 [get_clocks CLKIN]
set_clock_gating_check -setup 0.0

set_clock_uncertainty -setup 0.2 [get_clocks CLKIN]
set_clock_uncertainty -hold 0.2 [get_clocks CLKIN]

#create_clock -period 10  -name CLKIN [get_ports {clk}]

### 10% of clock
#set_clock_uncertainty -setup 0.200 [get_clocks CLKIN]
### does not depend on clock
#set_clock_uncertainty -hold 0.200 [get_clocks CLKIN]

#set_clock_transition -rise -min  0.2 [get_clocks CLKIN]
#set_clock_transition -rise -max  0.25 [get_clocks CLKIN]

#set_clock_transition -fall -min  0.2 [get_clocks CLKIN]
#set_clock_transition -fall -max  0.25 [get_clocks CLKIN]

#set_max_area

set_input_delay -clock [get_clocks CLKIN] -add_delay 0.3 [get_ports reset]
set_input_delay -clock [get_clocks CLKIN] -add_delay 0.3 [get_ports en]

set_output_delay -clock [get_clocks CLKIN] -add_delay 0.3 [get_ports out[0]]
set_output_delay -clock [get_clocks CLKIN] -add_delay 0.3 [get_ports out[1]]
set_output_delay -clock [get_clocks CLKIN] -add_delay 0.3 [get_ports out[2]]
set_output_delay -clock [get_clocks CLKIN] -add_delay 0.3 [get_ports out[3]]